Fuel System Modifications for a Bugeye Sprite
Steve
Maas
Long Beach, California, USA
January, 2007

My 1960 Austin-Healey "Bugeye" Sprite, restored to near-stock conditions, had a serious problem with vapor locking. Because of this, I decided to modify the fuel system to ameliorate the situation. This page describes the problem and its solution.
The Problem
When I bought my Sprite, it had the stock mechanical fuel pump, and the fuel lines were routed in the standard way: from the pump, a line went up to the front carburetor, where there was a "tee" junction, and a second line arched over the manifold to the rear carb. A plastic fuel filter had been installed in the line between the pump and front carb; originally, I believe, the 1960 Sprites didn't have a fuel filter. Just screens at the float-bowl inlets.
The transparent fuel filter became a window into the problems of the fuel system. When the filter was cool, it was full of fuel, but as it was heated by the engine, a large bubble formed. This bubble grew until it filled the filter almost completely. It was hard to see how fuel was getting through it at all. I could see bubbles--lots of large ones--coming up from the fuel pump, and the fuel coming out of the top of the filter was practically foaming! This was definitely disturbing to watch.
The car ran OK most of the time, but at traffic lights it sometimes would start to die. Revving the engine got it going again, but it sputtered a bit on acceleration for a minute or so, then finally ran properly--all the way to the next red light. It seemed to me that the fuel was "cooking" when the car was stopped and the engine was running slowly. Then, speeding it up brought fresh, cooler fuel into the system, and the higher pumping speed probably forced some bubbles out of the pump and, perhaps, a little more fuel through the filter.
Additionally, I have always been mistrustful of mechanical fuel pumps. Not only are they a trouble spot in any engine, but if a diaphragm were to split, gasoline would get into the sump. This would thin the oil and could lead to significant engine damage. The fact that a failed fuel pump stops the engine is probably a pretty good engine-protection feature. I don't think I would replace one of these by the roadside and then just drive away--that might be a short term fix and a longer-term disaster.
The Solution
It seems to me that if you want to cause vapor locking, mounting a fuel pump on a hot engine, six inches from the exhaust manifold, would be an excellent way to do it. This is exactly what we have in the Sprite. Clearly, I had to move the fuel line away from the engine and get the pump away, as well. This inevitably requires replacing the mechanical fuel pump with an electric one.
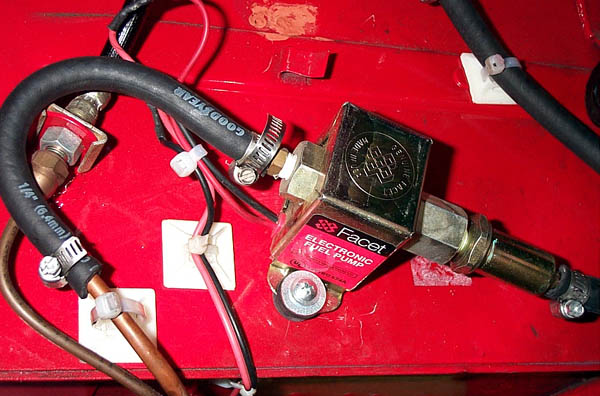
For the electric fuel pump, I chose the well known Facet unit. The Facet pump has a reputation for reliability, is inexpensive, and is readily available. It seemed like a good choice. The only criticism I've heard is that it's noisy, but among normal Sprite noises, it's almost inaudible. I got the model 40105, rated for 3.0-4.5 PSI at backoff, which is just what a Sprite needs. (My mechanical pump generates 3.5 PSI, and, fortuitously, the Facet was exactly the same.) The maximum flow rate is 30 GPH, which is more than adequate. (At 30 MPG, this would support a constant speed of 900 MPH, which is a bit beyond the Sprite's capabilities.) I have been told that 2.5 PSI is fine for a Bugeye; I would not go much over 3.5 PSI, as it isn't clear how much pressure the carburetor float valves can handle.
The Facet pump, like most electric fuel pumps, should be mounted close to the fuel tank and, for some reason, Facet recommends mounting it at a 45-degree angle. The obvious location in Sprites is the vertical body wall just forward of the rear axle. This provides for easy fuel-line plumbing and electric wiring. The pump requires a fuel filter at its inlet; I bought an inexpensive one and installed it. This is nice to have, as it makes the plastic filter at the carburetors, the source of many problems, unnecessary. Periodic replacement of the filter requires getting under the car, but it's not otherwise difficult. Located far from the engine, the electric pump and filter should be much cooler than the mechanical one, so vapor formation should be minimal.
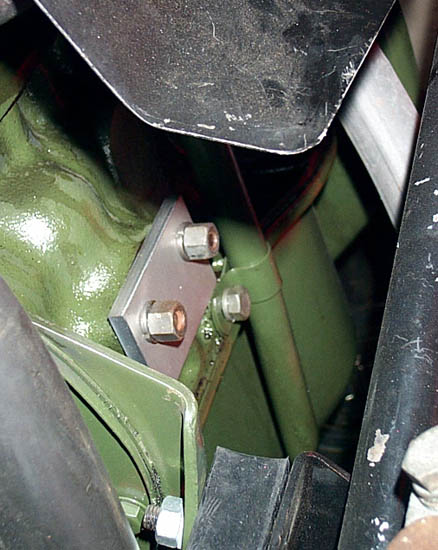
Below are pictures of the pump installation and the blank-off plate that replaces the mechanical pump. To see a larger picture, click on the thumbnail.
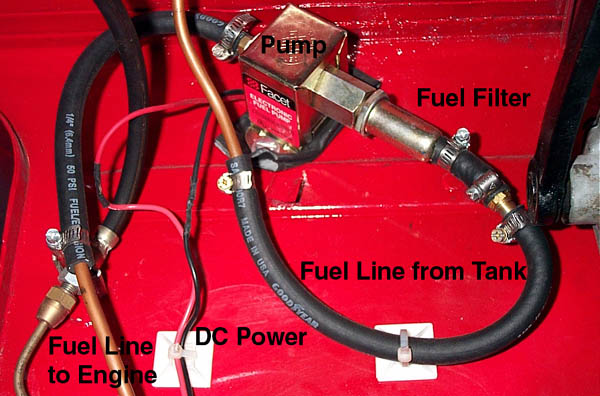
Electric wiring was not difficult. I ran the wire under the car on cable mounts and zip ties beside the fuel line. In the engine compartment, I connected it to the fuse block, in the switched circuit, of course, after adding a fuse of its own. I ran the ground to the engine compartment as well, instead of simply grounding it at the pump. This is largely the result of my sensitivity to common-ground problems in electronic installations, which probably is not an important issue here, and the lack of a really good ground point near the pump.
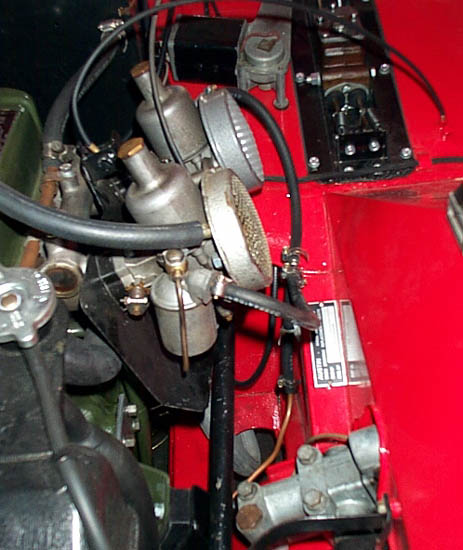
In the engine compartment, I removed the mechanical pump, made a blank-off plate from 1/4" aluminum, and cut a gasket for it using the pump flange as a template. I decided to route the fuel line away from the engine, but since it still was in a hot enclosure, I was concerned about bubbles forming in the fuel line. To see what was happening, I temporarily replaced the part of the line near the carbs with clear vinyl tubing. This showed me that bubbles blew through the line easily as long as there were no arches in the line--the line had to be continuous upward, then bubbles simply flowed up to the carbs and out through the float-bowl vents. Routing the line up along the body to a tee and finally upward to the carbs prevented large bubbles from forming in the line. I did see a lot of small bubbles forming--the fuel looked like champagne--but these had no effect on fuel flow.
In fact, even large bubbles, as long as they were only in the fuel line, didn't seem to affect fuel flow too badly. The real problem is bubbles in a mechanical pump, where they get trapped and interfere with the pump valves, or in a fuel filter, where they can't seem to blow through the filter element. The car ran well even with fairly large bubbles; the fuel seemed just to distort the bubbles and squeeze around them. That's probably why stock installations usually work well, at least on cool days (!). Still, large fuel-line bubbles represent an unnecessary potential source of problems, so it seems prudent to avoid them whenever possible.
Finally, I replaced the vinyl with the proper rubber fuel line, and now the car runs very nicely. Since making these modifications, I have had no trouble with sputtering at traffic lights. This may be due, in part, to cooler weather; summer performance will be the acid test. But for now, I'm confident that the problem is solved and that I've got a better system than the stock one. A little unexpected benefit of this modification is much smoother idle and more constant idle speed.
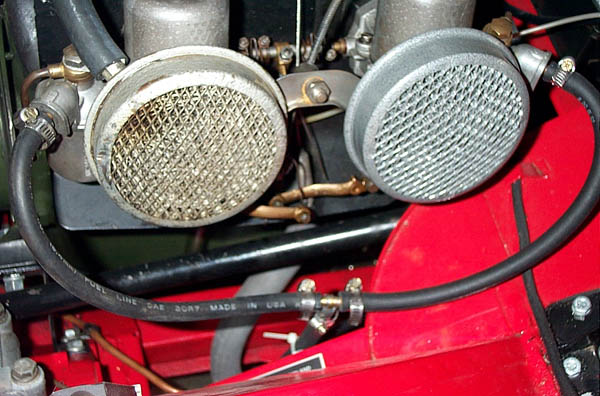
Below are two pictures of the fuel-line arrangement:
Later Modifications
The fuel-pump arrangement worked fine, but it did have one problem. The Facet pump makes a lot of noise when it encounters a vapor bubble. This is most likely to happen on hot days or when the fuel level is low. To minimize this problem, I remounted the pump lower, replaced the fuel filter with the one recommended by the manufacturer (Facet/Purolator FEP-735), and made thick rubber mounting washers that should isolate the pump a little better. I'm optimistic that this should minimize the noise.
Another Idea...
I didn't try this, as it occurred to me after I'd already bought the Facet fuel pump. But it really should work.
The low fuel pressure of older cars contributes to vapor locking. The higher the fuel pressure, the higher the fuel's boiling point and the lower the vaporization. So, it would seem simple to use a fairly high-pressure electric fuel pump, maybe 15-20 PSI, mounted near the tank, and use a regulator such as the Holley 12-804, located in the engine compartment, to drop the pressure to the required ~3.5 PSI at the carbs. The only potential problems I can see are an increased risk of leakage and the possibility that the pressure drop through the regulator might cause some bubble formation. Reasonable care in installing the fuel lines and a straight, upward route from the regulator to the carbs would probably prevent these difficulties. Just a thought.
A Final Note
Automobile fuels have changed a lot since 1960. The elimination of tetraethyl lead has necessitated the use of other additives to raise octane ratings. I have been told that these are considerably more volatile, perhaps contributing to vapor problems in older engines. (Probably not in newer engines, as the fuel systems are very different, and these days vapor locking is no longer a problem.) If this is true, it seems best to use the lowest grade of fuel possible; not a bad idea, in general. I'd be interested in hearing from anyone who knows more about this.
Disclaimer
I don't like saying this, but I suppose it's necessary, now that the lawyers have taken over American society. If you choose to do this, or something similar, but don't know enough about automobiles or electronics to be comfortable with it, get some help. In any case, I'm not forcing anyone to make this modification, so if you choose to attempt it, you take full responsibility for the results. This is just a report on my experience with these modifications. It is not intended to be a set of instructions for duplicating my work or a recommendation to do it. You're on your own.