Porsche 912 Electrical Upgrades
Steve
Maas
Long Beach, California, USA
March, 2011
The electrical system in my Porsche was not in terrible condition, but it certainly was ready for some repairs and upgrades. The previous owner had attempted some of these, but I wasn't happy with the approach he took. Time to redo it the way I think it should be.
The Problem
The fuse block in a Porsche 912 is not a good design. It has the following problems:
- It uses a bank of ceramic fuses with external lead elements. They are not good fuses, as they are easily damaged and the elements can corrode, altering the fusing current. Such fuses are notorious for blowing when there is no electrical fault.
- The conductive parts of the block are made of unplated brass, which corrodes easily, especially in the severe automotive environment.
- The fuse contacts are of an unplated brass-like alloy, probably beryllium copper, which is subject to corrosion as well, including galvanic corrosion from the fuse contacts.
- The fuse contacts do not guarantee the right pressure, wipe, or contact area for high-current contacts. The result is high contact resistance, contributing to fuse heating, which in turn causes the fuse to blow at current levels below its rating.
- Screw connections are used for the wiring. These pinch and work-harden the copper wire, causing strands to break, which increases the resistance and contact heating. They also can loosen easily. Such connections are one of the reasons why British cars of that era have a well established reputation for poor electrical reliability.
- The block has a brass strip on its underside connecting three supply-side terminals. This strip is notorious for coming loose or corroding, causing puzzling, intermittent electrical failures.
Additionally, much of the electrical system is not fused, but should be. This is a fire and safety hazard.
Like many cars of the era, Porsche 912s didn't use relays for the headlights, fog lights, and some other high-current circuits. Adding relays extends the life of the switches, which invariably are either expensive or unavailable. The previous owner had installed some of these, but they were not well mounted and many of the connections were wrapped with vinyl electrical tape, which deteriorates quickly. The goal, then, was (1) to replace the fuse block with a modern one using ATC fuses, (2) replace and relocate the existing relays, (3) add new relays, as appropriate, for other functions, and (4) modify the wiring so that previously unfused parts of the electrical system would be fused.
Click on any of the pictures below to bring up a larger version in a new tab or window.
The Fuse Block
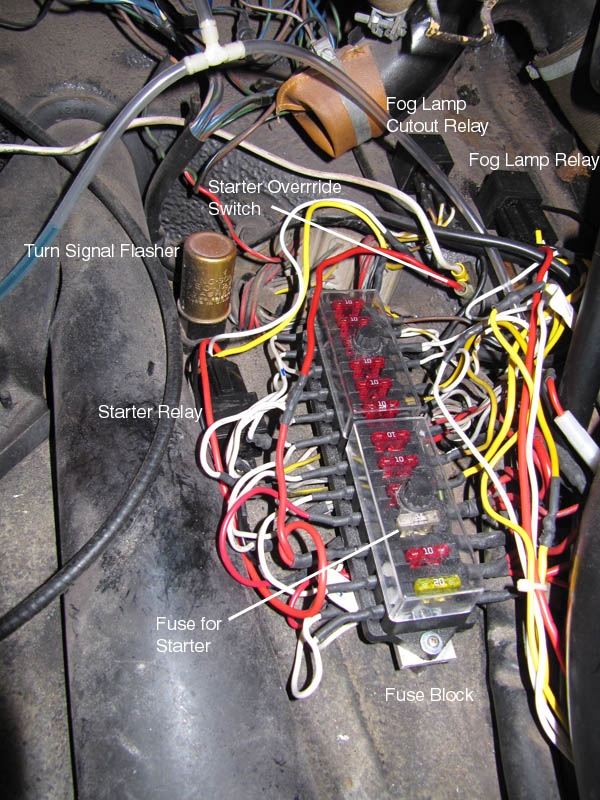
The situation I faced is shown below. The relay mounted on the steering column's housing with a zip tie is for the fog lights and the headlight relays are just barely visible on the right of the picture.
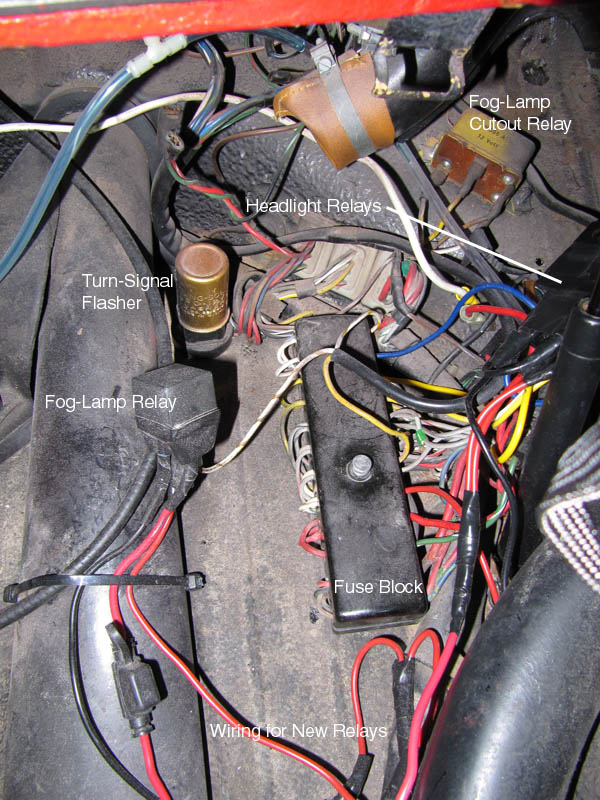
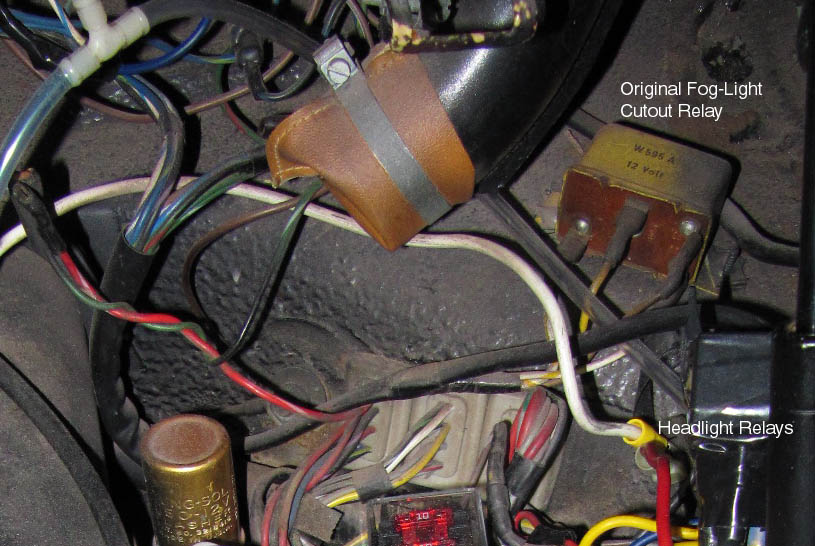
The headlight relay connections are a kludge. The relays are not mounted, and the whole mess is wrapped with electrical tape. The second picture below shows the headlight relays and the original fog-light cutout relay. This existed only in European cars; rules for fog lights required that they be off when high beams were on.

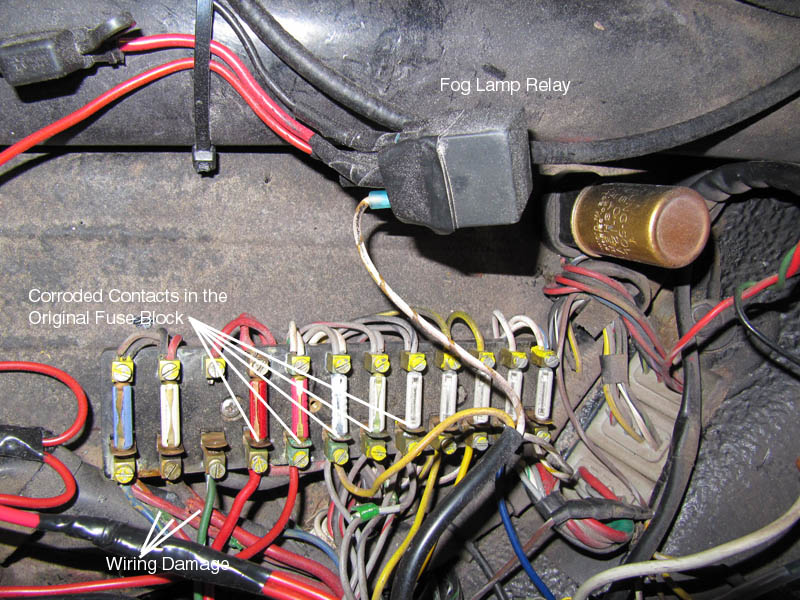
With the top off the fuse block, the problems become obvious. There is a lot of corrosion and wiring damage. Much of the wiring damage has resulted from overheating, a consequence of the corroded connections.
Block Replacement
The first step in this task, as with any electrical job, is to disconnect the battery.
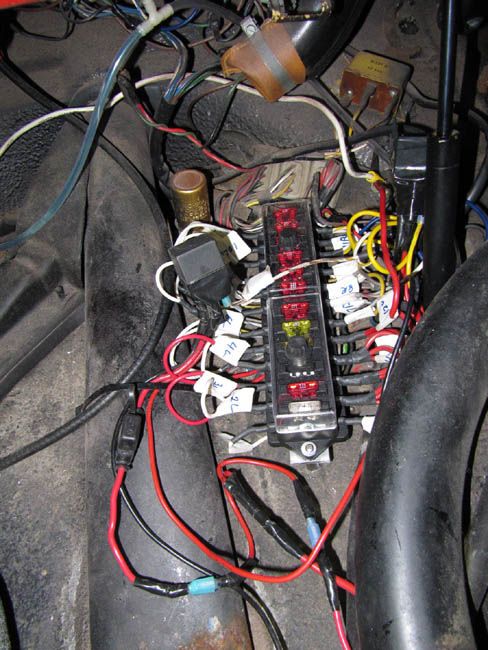
Replacing a fuse block isn't simple, as there is a lot of complicated wiring, and it's easy to forget where wires go. It's not possible to rely on wiring colors, as they don't always correspond to the wiring diagram and, with age, it's sometimes difficult to tell what the colors are. It's best to mark each wire as it's removed from the block. The picture below shows the wiring, all properly tagged.
Note that the problematical relays have not been removed yet. It's best to deal with one problem at a time, get things working properly, and then go on to the next modification. Trying to do it all at once is a good way to create a mess that's hard to sort out.

With the new block in place, the wires that go underneath are not long enough, so it is necessary to add some length to them. It is impossible to select wires that match the wiring harness, unfortunately, but this isn't much of a disadvantage. Once the block is in place, it's a good idea not to remove the tags immediately. Having them in place helps troubleshooting, in case something wasn't hooked up right.
Relays
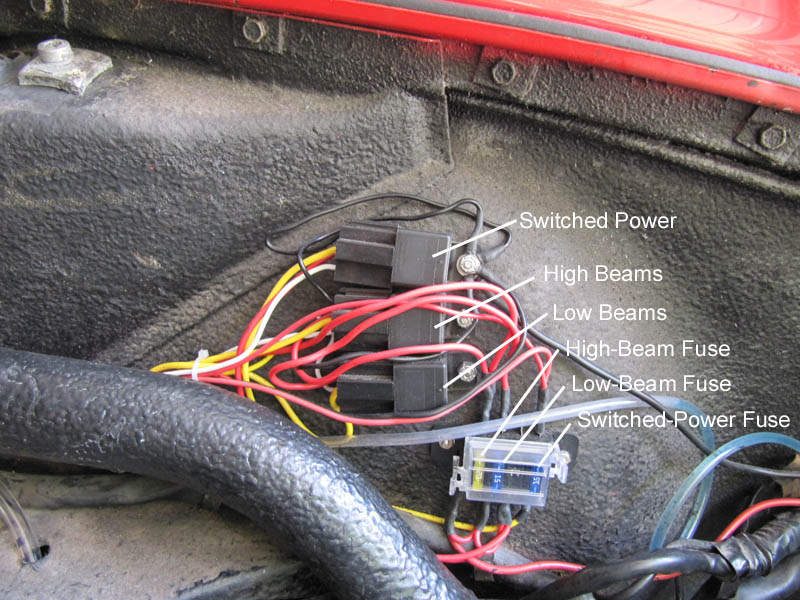
The relays were replaced with ones having mounting tabs, so they could be screwed to a solid surface, and they were located appropriately. I replaced the fog-light cutout relay with a modern one and mounted the headlight relays near the battery on the left side of the trunk, where they are somewhat protected by the gas tank's filler pipe. Finally, I replaced the in-line fuses with a block, leaving a couple of empty slots for possible future use. Earlier, I had discovered that a starter relay was mounted near the starter, dangling from the underside of the car. These relays cannot tolerate the outdoor environment, especially where they will be splattered with water and road debris, so now it's in the trunk area.
The starter relay requires a little explanation. The Porsche starter, of course, has an integral relay, which draws something like 15 amps. The ignition switch must handle that high current, which could lead to failure of the switch; in fact, the start positions of most Porsche ignition switches are pretty worn by now. The new relay allows this current to bypass the ignition switch. So, perhaps oddly, it is a relay that operates a relay. (Kits for making this modification are available; it's sometimes called a "hot start" relay.)
The "start" position in the ignition switch is nonetheless a little tired. A previous owner had bypassed it by installing a switch under the dash and a long wire to the starter; it's the heavy white wire in the picture below. After taking the picture, I removed it; a long, unnecessary run of wire to the rear of the car is now gone.
I have always been bothered by the amount of current in the ignition switch for ordinary, switched power. I added a third relay for switched power, so the ignition switch now carries only relay current. The no. 1 fuse still protects the switched circuits, but I moved the blue-yellow wire for the gauges to the load side of that fuse. This relay also switches the ignition and a newly installed electric fuel pump. Those are on a single fuse in the new block.
Further Modifications
The stock electrical system has a number of unfused circuits. It's hard to understand why so much was left unfused. I suspect that this was done for circuits affecting safety, with the recognition that the chance of a fuse blowing spontaneously is greater than the chance of an electrical failure. In any case, the practice is not unusual in cars of that era. With modern fuses, the chance of a fuse blowing spontaneously is small, so it makes sense to fuse all the car's circuits, and I have done so. Sometimes it's as simple as moving a wire from the source side of the fuse block to the load side; other times, it's more complicated.
Disclaimer
I don't like saying this, but I suppose it's necessary, now that the lawyers have taken over American society. If you choose to do this, or something similar, but don't know enough about automobiles or electricity to be comfortable with it, get some help. The consequences of wiring errors in high-current circuitry, as exists in any automobile, can be serious. In any case, I'm not forcing anyone to make these changes, so if you choose to attempt them, you take full responsibility for the results. This is solely a report on my experience. It is not intended to be a set of instructions for duplicating my work or a recommendation to do it. It's entirely possible that some of the things I've done in this installation may not be consistent with existing automotive electrical standards and practices, or may even be unwise. You're on your own.